

Crawl space repair is the process of finding and fixing problems like moisture, structural decay, and poor air quality that start under your house. A permanent solution usually involves a combination of waterproofing, adding structural support, and encapsulation to create a dry, stable space that protects your entire home.
What Every Homeowner Must Know About Crawl Spaces
Have you ever noticed a faint, musty smell when you turn on your heat or AC? That’s not a minor annoyance. For many homeowners in the GTA, it’s the first real clue that something is wrong right under their feet. Your crawl space might be out of sight, but its condition is directly tied to your home's structural integrity, the air you breathe, and your energy bills.
Ignoring those early signs is a mistake we see all too often, and it can be a costly one. A small problem in a crawl space rarely stays small. The unique environment down there—damp, dark, and with fluctuating temperatures—is the perfect breeding ground for serious issues.
Telltale Signs of a Failing Crawl Space
You need to know what to look for before a little problem becomes a structural nightmare. We've seen firsthand how seemingly minor symptoms can point to significant underlying trouble. Be on the lookout for these clear indicators:
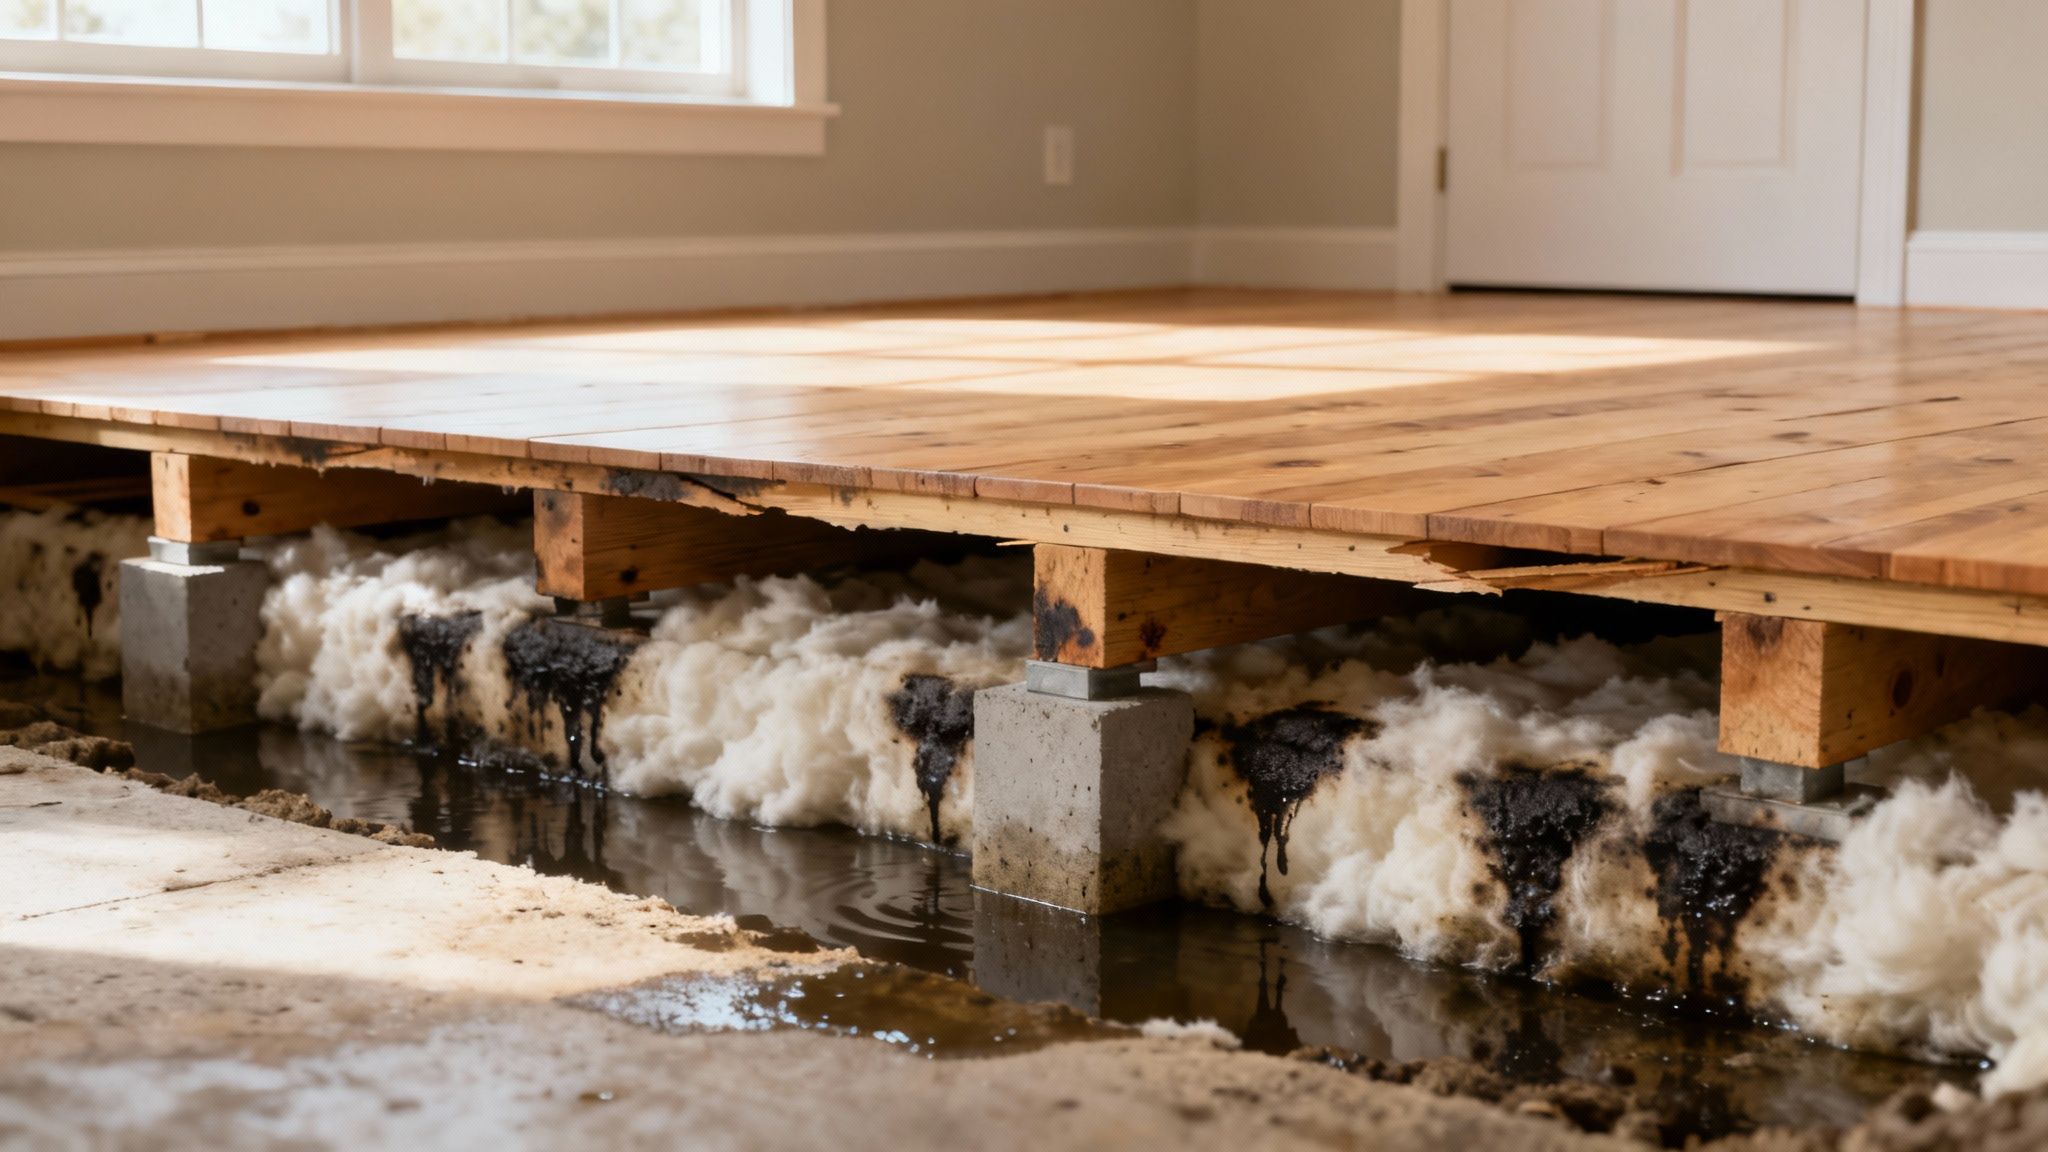
- Damp or Hanging Insulation: When insulation gets wet, it sags, pulls away, and loses all its insulating value. Worse, it becomes a perfect home for mould.
- Dark Stains on Wood: These are classic signs of wood rot or mould growth, which literally eats away at the floor joists and beams holding up your home.
- Sagging or Bouncy Floors: If you walk across a room and feel a soft, spongy, or uneven spot, that's a huge red flag. It means the support system underneath is failing.
- Musty Odours in Living Areas: Over 50% of the air on your home's main floor comes up from the crawl space. If it smells bad down there, you're breathing in mould spores and damp, unhealthy air.
A damp crawl space doesn’t just stay damp; it actively works against your home. It rots your floor joists, invites pests, and pumps unhealthy air into your living room. The longer you wait, the more complex and expensive the crawl space repair becomes.
The Root Causes of Crawl Space Problems
Getting to the root of these issues is the only way to find a permanent solution. After 25 years in this business, I can tell you that almost every crawl space problem comes back to one thing: uncontrolled moisture.
This water gets in from a few common sources. Poor grading outside can funnel rainwater right against your foundation, where it seeps through tiny cracks. High humidity during our summers condenses on cool surfaces under the house. Even the earth itself constantly releases water vapour, creating a perpetually damp environment.
Once moisture gets a foothold, it sets off a destructive chain reaction. Wood soaks it up, leading to rot. This damp, rotting wood is an open invitation for pests like termites, which accelerate the damage. Eventually, the weakened structure can no longer support the weight above, and you start seeing the sagging floors that put your whole home at risk. Effective crawl space repair must tackle these root causes, not just patch up the symptoms.
What a Professional Crawl Space Inspection Involves
Any legitimate crawl space repair begins with a thorough inspection. This isn't just about spotting the obvious problems; it's about finding the root cause. Anyone can point a flashlight at a damp corner, but an experienced professional knows what to look for, what tools to use, and how to piece together the clues to form a complete picture of your home's health.
Think of it as a forensic investigation of the substructure holding up your house. A contractor who dedicates real time to this initial step is showing you they're committed to a permanent fix, not a quick patch-up job.
What We Look For Under Your Home
When we get into a crawl space, our goal is to understand the entire system. We are on the hunt for every potential point of failure, from hidden water sources to the early signs of structural decay.
Our assessment zeroes in on a few critical areas:
- Moisture and Water Sources: We don’t just guess where water is coming from. Using tools like moisture meters, we get precise readings from the wood and concrete. We’re tracing water back to its source, whether that's groundwater pushing through foundation walls, a slow plumbing leak, or heavy condensation.
- Structural Integrity: This part is hands-on. We physically check your floor joists, support beams, and sill plates for any sign of wood rot, mould, or insect damage. We’ll also inspect every support post to make sure it's stable and not failing under the load.
- Foundation Health: We carefully examine the foundation walls for cracks, bowing, or any signs of shifting. These issues often point to hydrostatic pressure—the force of water-logged soil pushing against your home—which is a major red flag that must be addressed.
A detailed inspection report is your roadmap to a solution. It should clearly explain not just what's wrong, but why it's happening. If a contractor can't tell you the cause, their "solution" is likely just a bandage.
Environment and Safety Come First
A true professional also recognizes the challenges of working in a crawl space. Adhering to strict safety protocols is non-negotiable. Following an essential confined space safety guide is standard practice to protect our crew and ensure the job is done right.
Ultimately, the inspection should leave you with a clear and honest diagnosis. Armed with that knowledge, you can properly evaluate the proposed repair plan and make a confident decision. The quality of the inspection says a lot about the quality of the work to come, which is why knowing how to find the right contractor is one of the most important first steps you can take.
Winning the Battle Against Crawl Space Moisture
Moisture is the number one enemy of a healthy crawl space. It's the catalyst for nearly every major problem—wood rot, musty odours, mould, pest infestations, and even serious structural decay. Getting a handle on moisture isn't just a part of the repair process; it's the most critical fight you need to win for the health of your entire home.
First, we play detective, hunting down and sealing any obvious entry points. We meticulously inspect your foundation for cracks, gaps where pipes enter, and any vents that aren't properly sealed. Each one is an open door for water, and plugging these holes is the first essential step in any real moisture control plan.
Building a Defensive Barrier Against Ground Moisture
With the obvious gaps plugged, we then have to deal with the moisture that's constantly rising from the ground itself. You can't see it, but it's always there. This is where a high-quality vapour barrier is an absolute game-changer. A professionally installed, heavy-duty liner gets laid down over the entire dirt floor and run partway up the foundation walls, creating a solid barrier between the damp earth and your home's structure.
This infographic gives you a visual of how a complete system comes together, with the vapour barrier, sump pump, and dehumidifier all working in concert.
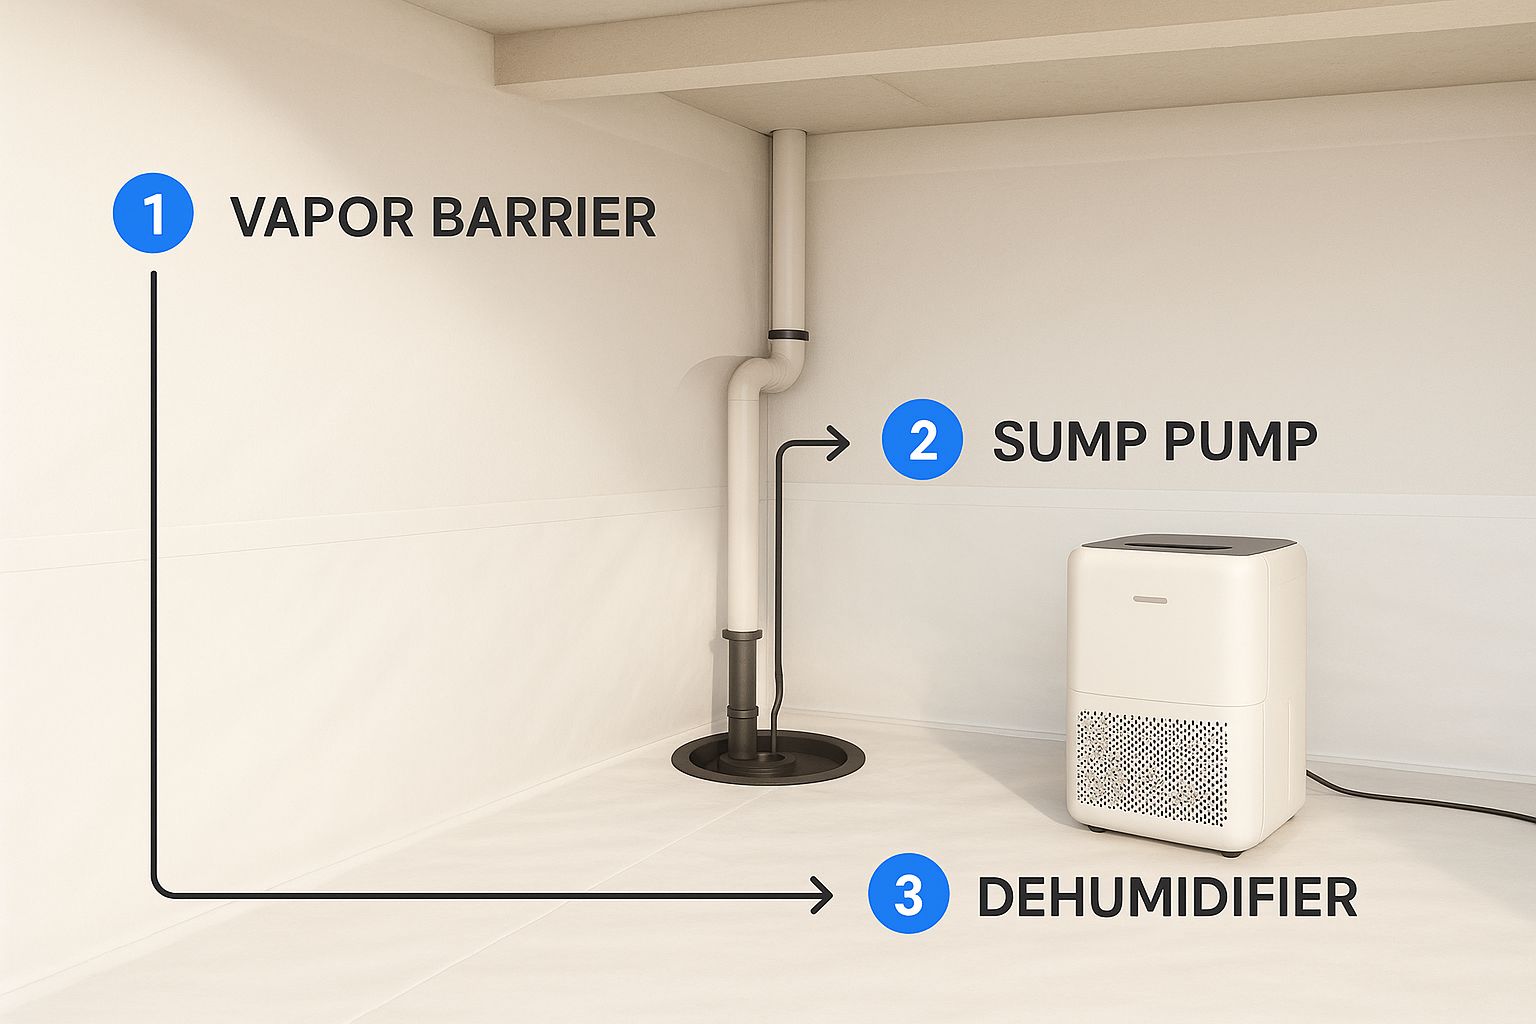
As you can see, it's not just one thing—it's a team of components actively pulling moisture from the ground and air to keep the space dry and protect your home from the bottom up.
Actively Managing Water and Humidity
For many homes here in the GTA, especially those with high water tables, a vapour barrier by itself isn't enough. This is when a sump pump becomes non-negotiable. It acts as your failsafe to collect any water that does get in and pump it safely away from your foundation. It stops pooling and flooding before the damage is done.
Being proactive is a big part of winning this battle. Knowing how to detect water leaks early, both inside your home and in the crawl space, can save you from expensive headaches down the road.
Finally, we tackle the humidity in the air itself with a high-efficiency crawl space dehumidifier. These are not like the little units you buy for a basement room; they're purpose-built to handle the tough conditions under a house. They work automatically to keep the humidity level right where it needs to be—typically below 50%—to shut down the conditions mould needs to grow.
A proper moisture control system is about playing both defence and offence. You defend against outside water with sealing and smart landscaping. You go on offence against internal moisture with a vapour barrier, sump pump, and dehumidifier.
It’s also crucial to remember that your yard plays a huge role. Proper grading and working eavestroughs are your first line of defence. If your property slopes toward your house or downspouts dump water right against the foundation, you’re inviting trouble. For more on this, check out our guide on downspout extensions and French drains.
Repairing Structural and Foundation Damage
When moisture sits in a crawl space for too long, the problem goes beyond mould and musty smells. It starts to eat away at the very bones of your house—the wooden joists, beams, and sill plates holding everything up. This is where the job turns from moisture control into a critical structural repair.
This is serious business that demands a deep understanding of how a home carries its load.
Seeing rotted wood holding up your living room floor can be a gut-wrenching experience. But the repair process, when handled by professionals, is methodical and completely safe. We don't just put a bandage on the problem; we get in there and restore the strength of your home’s support system from the ground up.
Restoring Your Home's Support System
Safety always comes first. Before we touch a piece of rotted wood, we install temporary supports to carry the weight of the house. This makes the work area stable and keeps your home secure throughout the entire process.
Once the structure is properly supported, we carefully cut out and remove the compromised materials. This usually involves:
- Sill Plates: The wood that sits directly on your concrete foundation walls.
- Floor Joists: The parallel beams that span the crawl space and support the floor you walk on.
- Rim Joists: The joists that form the outer frame of your floor system.
New, pressure-treated lumber is then measured, cut, and fitted precisely into place. This re-establishes the solid connection between your foundation and the rest of the house.
Sometimes, a joist is weakened but not beyond saving. In those cases, we use a technique called "sistering"—we securely bolt a brand-new joist right alongside the old one. It's an effective way to double its strength and load-bearing capacity without a full replacement.
Addressing Sagging Floors and Foundation Walls
Are your floors feeling bouncy or starting to sag? That’s a telltale sign that the support columns in your crawl space are failing, sinking into the soil, or were installed too far apart from the beginning.
The permanent fix is to install modern, adjustable steel support posts, often called smart jacks. These are engineered to do more than just stabilize the floor; they allow us to gently and gradually lift sagging sections back to where they are supposed to be—perfectly level.
Foundation wall problems like cracks or bowing need a different approach. Small cracks can often be sealed, but significant wall movement is a red flag that requires serious reinforcement. Learning about the top materials for repairing a cracked foundation will give you a good sense of how these bigger issues are tackled.
The goal of any structural crawl space repair shouldn't be just to replace what’s broken. It's about making the entire system stronger and more resilient than it was before, ensuring your home is stable for the long haul.
It's understandable to worry about the cost of this kind of work. The average cost for crawl space repair can vary depending on the extent of the damage. A minor fix might only be a few thousand dollars, but projects with major structural work will be on the higher end. You can learn more about crawl space repair cost factors to get a better idea of what to expect.
Why Crawl Space Encapsulation Is the Ultimate Fix
Once you've managed any standing water and fixed the immediate structural damage, you're faced with a big question: how do you stop this from happening all over again? This is where we stop talking about simple repairs and start discussing a true, long-term solution—crawl space encapsulation.
Encapsulation is about completely transforming the environment under your home. You're turning a damp, musty, and problematic area into a clean, dry, and healthy space that genuinely protects your house from the ground up.
Essentially, you're creating a sealed envelope that isolates your home from the damp earth below. The entire point is to gain absolute control over the crawl space atmosphere, cutting off moisture at the source for good.
How Encapsulation Really Works
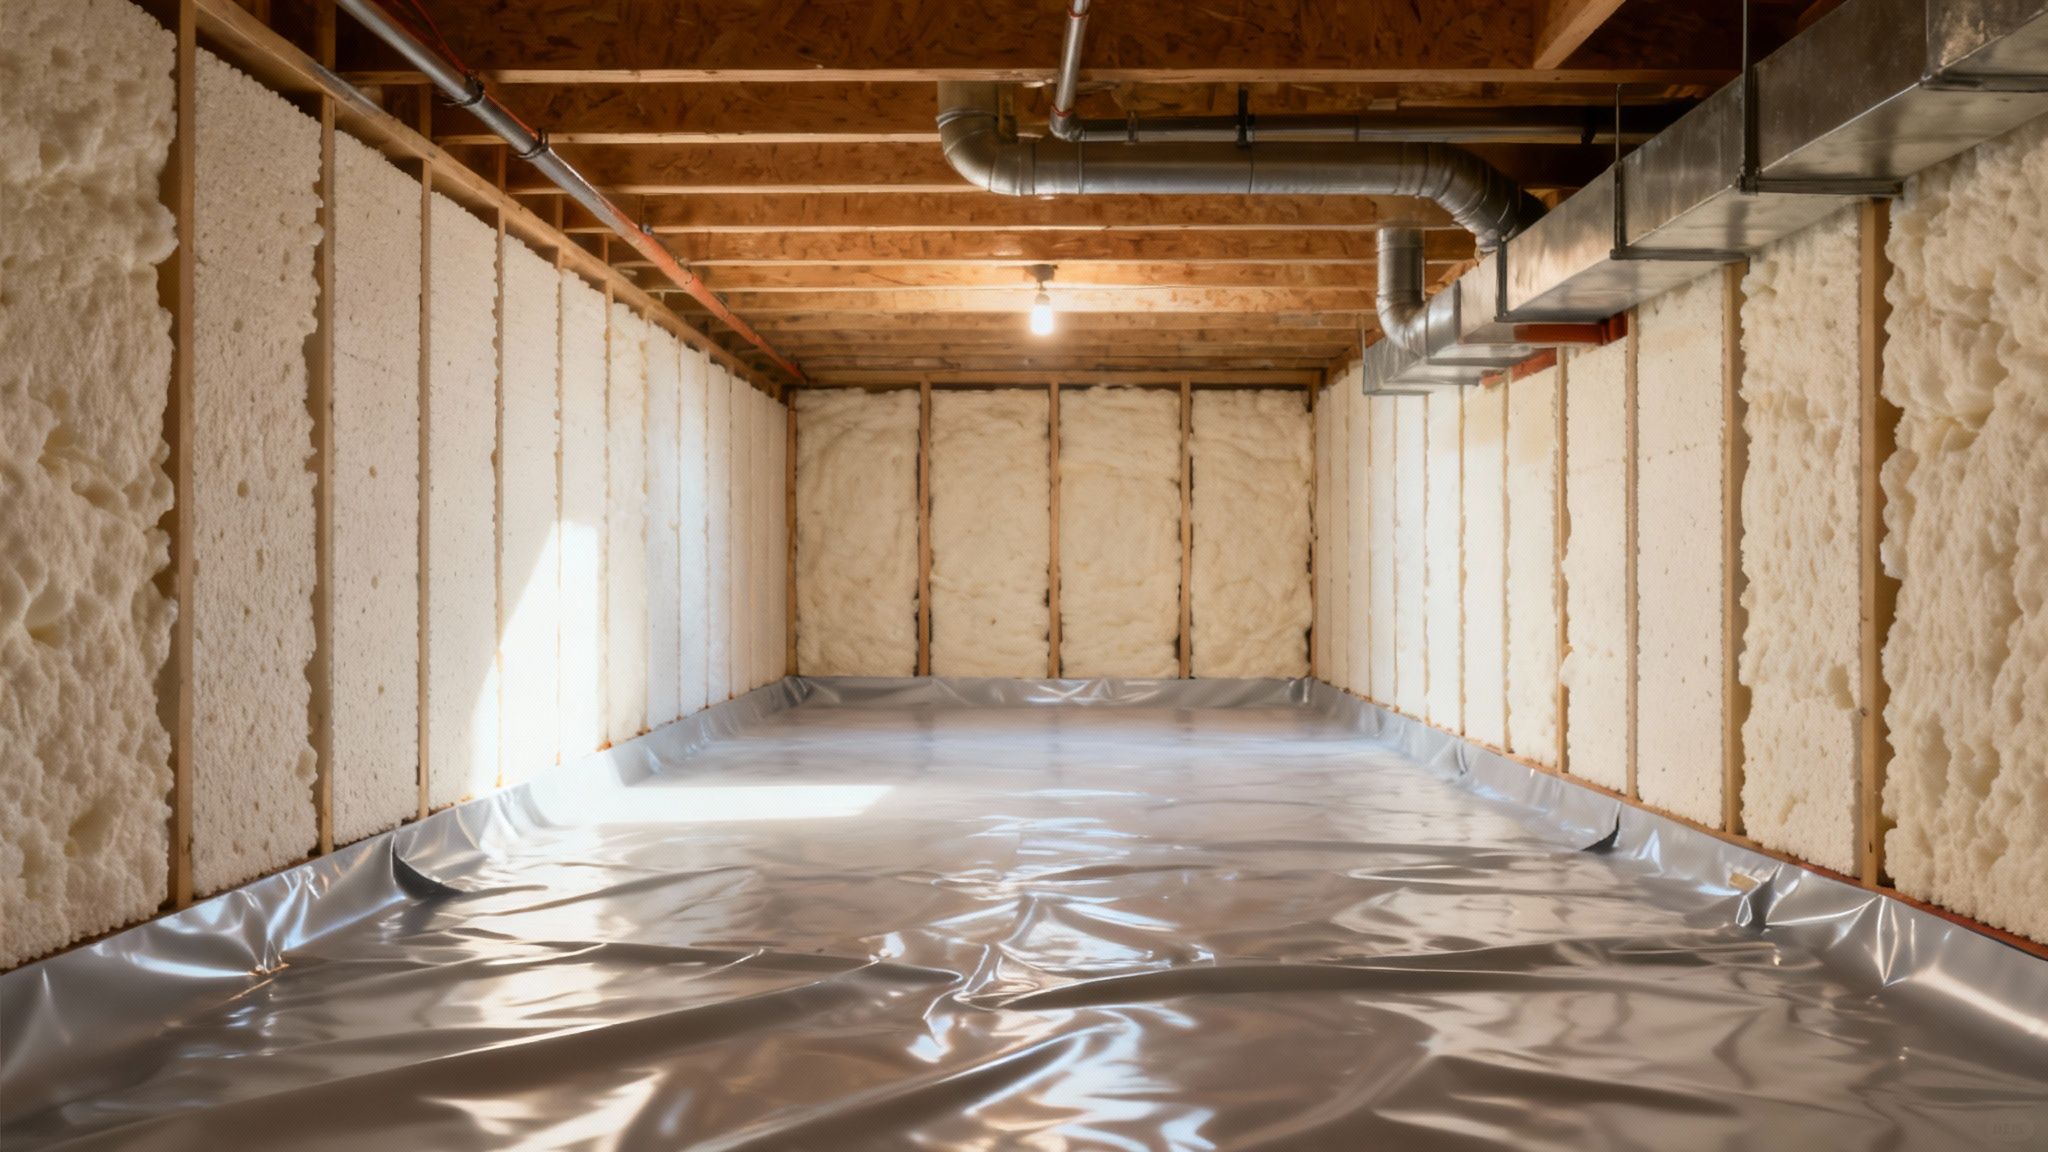
The process is meticulous. It begins by laying down a heavy-duty, reinforced vapour barrier across every square inch of the dirt floor. We’re not talking about a thin sheet of plastic you can pick up at a hardware store. This is a tough, puncture-resistant liner.
Each section is overlapped, the seams are sealed with special waterproof tape, and the entire system is mechanically fastened to the foundation walls. This creates a continuous, unbroken shield that stops water vapour from rising out of the ground—the very moisture that fuels mould and rot.
The core idea behind encapsulation is simple but powerful. Instead of constantly fighting moisture after it gets in, you create an environment where moisture can't exist in the first place. It changes the game from reactive repairs to proactive protection.
Insulating the Right Way for Health and Efficiency
One of the most common mistakes I see in crawl spaces is soggy, sagging fiberglass batt insulation hanging between the floor joists. The moment it gets damp (and it always does), it becomes useless for insulation and turns into a perfect home for mould. It has to go.
With a proper encapsulation, that failing insulation is completely removed. Instead, we insulate the foundation walls themselves using rigid foam board insulation. This approach is superior for a few key reasons:
- It Controls Temperature: The crawl space stays much closer to the temperature of the rest of your home.
- It Stops Condensation: It prevents warm, humid air from making contact with cold foundation walls, a major source of moisture.
- It’s Waterproof: Unlike fiberglass, rigid foam doesn't absorb water, so it will never get mouldy, sag, or lose its insulating value.
This strategy effectively brings the crawl space inside your home's conditioned "envelope," rather than leaving it as a vented, damp space working against your home's comfort and efficiency.
The final piece of the puzzle is a powerful, professional-grade dehumidifier. These units are built specifically for the tough conditions in a crawl space and are set to keep the relative humidity consistently below 50% all year round. This is the magic number for preventing mould growth and protecting the wood that holds up your house.
By combining a sealed vapour barrier, the right kind of insulation, and active humidity control, encapsulation delivers the most complete and permanent solution for any troubled crawl space.
Your Crawl Space Repair Questions, Answered
Every homeowner I talk to has a few key questions on their mind before they commit to a crawl space repair. Getting straight, honest answers is the only way you can feel good about your investment, so let's walk through the most common ones I hear out in the field.
How Long is This Going to Take?
That’s usually the first question people ask. The honest answer is: it depends on what we find.
A straightforward job, like laying down a basic vapour barrier in a clean, easy-to-access crawl space, can often be done in a single day. We can get in, get it done, and be out of your hair with minimal disruption.
But a full encapsulation project that also involves structural work is a different beast. If we need to sister joists, pour new footings for support posts, and then seal the whole thing up, the timeline gets longer. These more comprehensive jobs can take anywhere from a few days to over a week. We’ll always give you a realistic timeline upfront so you know exactly what’s involved.
Can I Do This Myself?
I have a lot of respect for a homeowner who’s willing to get their hands dirty. But a crawl space is a uniquely challenging and unforgiving place to work. While someone who's particularly handy might be able to lay down a plastic sheet, most of the real repair work comes with serious risks if you don't know what you're doing.
Here’s my honest take:
- Maybe DIY: Cleaning out old debris or sealing a few small, obvious foundation cracks.
- Call a Pro: Anything to do with structural supports, electrical wiring for equipment like sump pumps, or a proper encapsulation.
One missed seam on a vapour barrier can let moisture in and render the whole system useless. Worse yet, trying to jack up a sagging floor or move a support post without the right gear and engineering knowledge can lead to catastrophic failure. The potential for a mistake that costs thousands to fix is just too high.
When it comes to the structure holding up your home, this is one job where it is always safer—and cheaper in the long run—to trust a professional. I've seen too many DIY repairs that ended up costing double to fix what it would have cost to hire an expert from the start.
Is Encapsulation Really Worth the Money?
In a word, yes. It's best to think of encapsulation not as a repair cost, but as a permanent upgrade to your home’s health, efficiency, and value. The long-term payoff is huge. By completely sealing off your home from ground moisture and controlling the humidity, you put a full stop to the cycle of wood rot and mould growth.
The benefits reach your main living area, too. You’ll notice vastly improved indoor air quality once you stop pulling musty, spore-filled air up from below. Your furnace and air conditioner will also run more efficiently in a conditioned space, which often leads to lower monthly energy bills.
Ultimately, a clean, dry, and stable crawl space isn't just a fix—it's a major asset.
Ready to get clear answers and a permanent solution for your home? The team at G1000 Home Substructure is here to help. Schedule your free, no-obligation consultation today.

