

A proper weeping tile installation isn't just a quick fix for a damp basement—it's a permanent defence system for your home's foundation. This system is designed to actively collect and redirect groundwater, stopping it in its tracks before it can press against your foundation walls and cause real damage.
Why Your Foundation Needs a Weeping Tile System

Before we think about digging, it's critical to understand what a weeping tile installation actually does for your home. We've seen it countless times: a homeowner finds a leak and assumes the problem is just that one damp spot. But that leak is usually just a symptom—a sign of a much bigger issue happening outside your walls.
The real culprit behind most wet basements is something called hydrostatic pressure. Imagine the sheer weight of groundwater in the soil surrounding your home, constantly pushing against the foundation. After a heavy Toronto rainstorm or a quick spring thaw, the ground becomes saturated, and that pressure becomes immense. Concrete feels solid, but it's actually porous. Over time, that relentless pressure forces water right through, leading to leaks, cracks, and all sorts of moisture problems.
Intercepting Water Before It Becomes a Problem
This is where a weeping tile system becomes your foundation's best friend. It doesn't just put a bandage on a leak; it tackles the pressure at its source. We do this by laying a perforated pipe around the very base of your foundation, right at the footing level. This creates an easy escape route for all that groundwater.
Instead of fighting its way through your concrete, the water finds the path of least resistance and flows into the pipe, where it's channelled safely away from your home. This preventative strategy is the key to maintaining a dry, healthy basement for the long haul.
A correctly installed weeping tile system is an interceptor. It catches groundwater at the lowest possible point—your foundation's footing—and guides it away long before it gets a chance to seep through your walls, cause structural stress, or create the damp conditions mould loves.
The Long-Term Benefits of a Dry Foundation
Putting in a professional weeping tile system is an investment that pays off in more ways than just giving you a dry space. You're protecting the very core of your home. The benefits are substantial and built to last:
- Structural Integrity: When you relieve that constant hydrostatic pressure, you drastically reduce the risk of your foundation walls cracking or bowing. It keeps your home stable.
- Improved Air Quality: A dry basement is a healthy basement. It prevents the growth of mould and mildew, which can release nasty spores into the air your family breathes.
- Increased Property Value: A fully waterproofed basement with a proper drainage system is a huge selling point. It gives potential buyers peace of mind.
- Usable Living Space: It transforms a damp, musty cellar into a safe, comfortable area you can actually use for a family room, home office, or just clean, dry storage.
This proactive approach is crucial for preventing the common causes of basement leaks, ensuring your home stays secure for years. You'll find these drainage systems are essential not just in rainy climates but anywhere with high water tables, where they work to direct water away to storm sewers or sump pumps, keeping foundations protected.
The Groundwork: Planning Your Weeping Tile Installation
Any seasoned pro will tell you that the success of a weeping tile system is determined long before the excavator arrives. We’ve seen firsthand how a lack of proper planning can turn a straightforward job into a costly nightmare. Getting these initial steps right is your best insurance policy for a dry basement.
Think of it as your pre-flight check. It all starts with a simple walk around your property, ideally after a good, heavy rain. Where does the water go? Pay close attention to any spots where it pools up against the foundation. This little bit of detective work tells you a lot about your property's grading and where the hydrostatic pressure is hitting your home the hardest. It's the first clue in mapping out the problem we need to solve.
Getting to Know Your Soil
The dirt around your foundation has a huge say in how water behaves. Here in the Toronto area, we deal with a lot of heavy clay soil. Clay acts like a sponge, holding onto moisture and creating a saturated, high-pressure zone right against your basement walls. On the other hand, if you have sandier soil, water passes through more easily, but it can still become overwhelmed during a downpour.
Knowing your soil type is crucial. It dictates how much drainage gravel we’ll need and the best way to backfill the trench to ensure water can actually get to the weeping tile. It’s a fundamental piece of the puzzle.
The Most Important Phone Call You'll Make
Before a single shovel hits the ground, we have to talk about safety—specifically, locating underground utilities. This is a non-negotiable, absolute must-do. You need a professional to come out and mark every buried gas line, water main, electrical conduit, and communication cable.
Accidentally hitting a gas line isn't just an expensive mistake; it's a life-threatening emergency. In Ontario, this service is completely free through Ontario One Call. They coordinate with all the local utility companies to come to your property and mark the lines with paint or flags. Never, ever dig without seeing those marks.
A reputable contractor will insist on a utility locate before starting any excavation. It’s the clearest sign that they put safety first and are protecting you, your family, and your property from a potential disaster.
Inside Job or Outside Job? Choosing Your System
One of the biggest decisions you'll make is whether an interior or exterior weeping tile system is the right fit. There’s no single "best" answer; it all comes down to your home, your property, and your budget.
Here’s a quick rundown of the two approaches:
- Exterior Weeping Tile: This is the gold standard for basement waterproofing. We dig all the way down to the foundation footing, apply a waterproof membrane to the walls, and then install the weeping tile. It’s a comprehensive solution that stops water before it even has a chance to touch your foundation. While it's more disruptive and involves a bigger investment, it offers the most robust, long-term protection.
- Interior Weeping Tile: Sometimes, digging outside just isn't an option. Maybe your houses are too close together, or you have an expensive deck or mature landscaping you don't want to disturb. In these cases, we work from the inside. A channel is carefully cut into your basement floor along the perimeter, a drainage pipe is laid inside it, and it's all connected to a sump pump. This system works by managing any water that gets under the slab, collecting it, and pumping it safely away.
Finally, don't forget to check in with your local municipality. Building codes across the GTA have specific rules about drainage and where you can direct the water from your sump pump. Some regions, like Halton Hills or Markham, even offer financial incentives for homeowners who take proactive steps to prevent basement flooding. A quick call to your local building department will clarify any permit requirements and ensure your project is compliant from the get-go.
Getting Down to the Nitty-Gritty: The Excavation Process
This is where the real work begins. Excavation is easily the most disruptive part of installing a weeping tile system, and knowing what to expect can make the whole project feel a lot smoother. This isn't just about digging a hole; it’s a careful, strategic operation that sets the stage for a system that will protect your home for years to come. Hiring a professional foundation excavation contractor is often the best move here, as precision is everything.
The first thing we do is carefully remove and set aside anything valuable along the foundation wall—think prized rose bushes, patio stones, or other landscaping features. Once the area is clear, we bring in the heavy equipment. A mini-excavator is usually the perfect machine for the job, as it's powerful enough to dig efficiently but small enough to manoeuvre in tight residential spaces.
Our goal is to dig a trench, typically two to three feet wide, all the way down to the foundation's footing. That’s the concrete base your entire house sits on, and reaching it is crucial for the system to work as intended.
Precision from the Very First Scoop
Every bucket of dirt we pull out matters. The bottom of the trench needs to have a consistent, gentle slope—we're talking about a one-eighth of an inch drop per foot—to guide water naturally toward its exit point, whether that’s a sump pump or a storm sewer connection. This gradual decline lets gravity do all the work.
We've seen jobs where the slope was off by just a couple of inches. That tiny error can create low spots where water just sits and pools, completely defeating the purpose of the weeping tile. This is exactly why we use laser levels to constantly check the grade. There's simply no room for guesswork.
This infographic gives you a great contractor's-eye-view of what a precise excavation looks like, from the equipment in action to that critical trench slope.
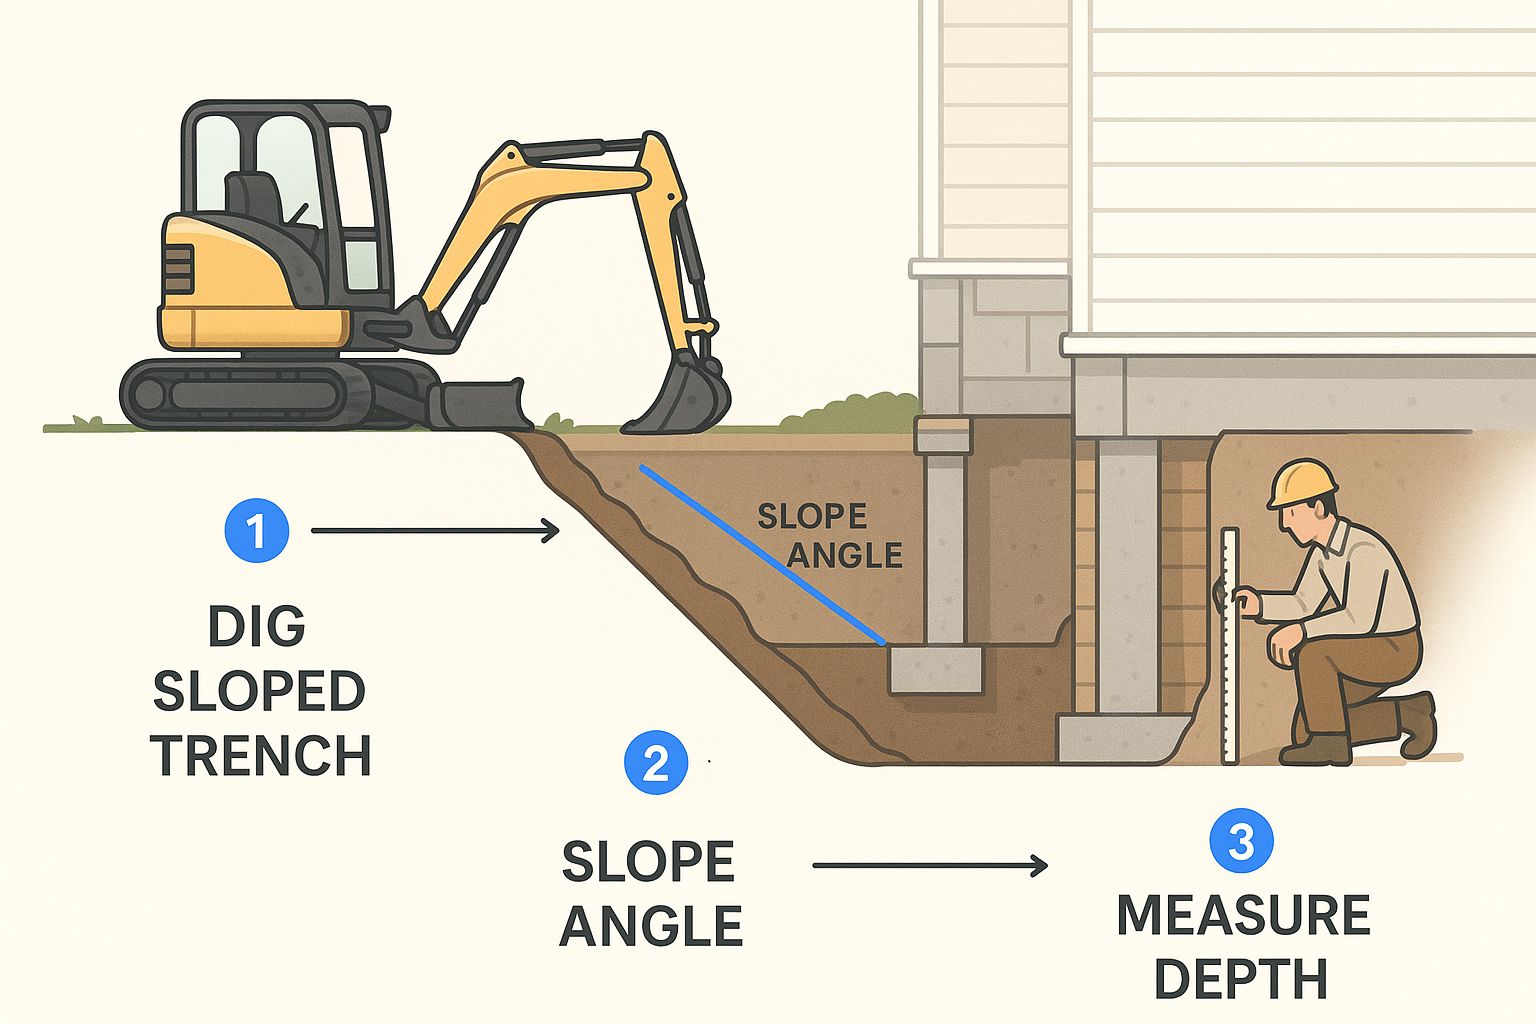
As you can see, every element—from the shoring walls that ensure safety to the careful depth measurements at the footing—plays a part in a successful installation.
Safety in the Trenches
Once that trench is open, the most immediate danger is collapse. The weight of the surrounding soil is immense, and our absolute top priority is safety.
To stop the trench walls from caving in, we install shoring. This usually involves bracing heavy-duty plywood or specialized metal plates against the foundation and the outer trench wall. It creates a secure workspace for our team and, just as importantly, protects your home's foundation from the immense pressure of the excavated earth.
This step is completely non-negotiable. An unshored trench is a serious hazard, and any crew worth their salt will make it a standard part of their process.
The excavation phase is about so much more than just moving dirt. It's about creating a perfectly graded, safe, and accessible workspace around the most vulnerable part of your home. It’s the foundation upon which a reliable waterproofing system is built.
The type of soil around your home can also throw a wrench in the works. In areas with a high water table or certain soil types, a standard weeping tile might struggle. For example, some fine, silty soils can easily clog a perforated pipe over time. In these cases, we have to use specialized filter fabrics to wrap the system and keep it clear and functional for the long haul.
Finally, you have to figure out what to do with all that excavated soil. It's a surprisingly large amount of earth, and it all has to go somewhere. We'll reuse some of it for backfilling later on, but the excess has to be hauled away. This takes some careful coordination to avoid turning your property—and your neighbour's—into a total mess. If you're tackling a larger renovation at the same time, it might be worth looking into the advantages of hiring a demolition and disposal company to manage all the debris.
Interior vs Exterior Weeping Tile Systems
When you're dealing with a wet basement, you'll hear about two main approaches: digging up the outside (exterior) or trenching the inside of your basement floor (interior). Each has its pros and cons, and the right choice really depends on your specific situation, property, and budget.
Here’s a quick breakdown to help you compare the two.
| Factor | Exterior System | Interior System |
|---|---|---|
| Effectiveness | Stops water before it ever touches the foundation walls. The most comprehensive solution. | Manages water that has already seeped through the foundation. Highly effective at keeping the basement dry. |
| Cost | Significantly more expensive due to major excavation, landscaping repair, and labour. | More affordable as it avoids large-scale excavation. The primary costs are concrete cutting and labour. |
| Disruption | Highly disruptive to landscaping, patios, and driveways. Requires heavy machinery. | Less disruptive to the exterior of your home, but creates significant dust and noise inside. |
| Installation Time | Can take a week or more, depending on the size of the home and weather conditions. | Typically installed in just 2-3 days. |
| Best For | Addressing serious foundation wall leaks, cracks, and saturated soil issues. | Homes with tight property lines, extensive landscaping, or when an exterior dig is impractical. |
Ultimately, an exterior system is the gold standard for stopping water at the source. But an interior system is a fantastic, reliable, and more budget-friendly option that does an excellent job of managing water and ensuring your basement stays dry.
Laying Pipe and Waterproofing the Foundation: Getting It Right

With the trench dug out, we're at the most critical phase of the whole project. This is where we build the two-part defence system that will keep your basement bone dry for years to come. It’s a precise job that involves sealing the foundation from the outside while giving groundwater a reliable escape route.
We’ve fixed countless jobs where contractors have cut corners here, and it always ends the same way—a failed system and a frustrated homeowner facing the same soggy problems. Getting this part right demands attention to detail and a real understanding of how water behaves under pressure.
First Line of Defence: Sealing the Foundation Wall
Before any pipe even touches the ground, our first focus is the foundation wall itself. Now that it’s exposed, we thoroughly clean and prepare the concrete for its primary shield against moisture: a high-quality waterproofing membrane.
This isn't just a swipe of sealant or a coat of tar. A proper membrane is a thick, rubberized, and totally impermeable barrier that physically blocks water from getting through the concrete. Its entire job is to stop moisture dead in its tracks. You can dig deeper into how this layer works and what goes into choosing the right one by reading our guide to a waterproofing membrane for your foundation.
Applying this membrane correctly is absolutely essential. It needs to be seamless, running from just above ground level all the way down to cover the footing. Even the smallest gap can become a major weak point under hydrostatic pressure.
Creating the Perfect Bed for Your Weeping Tile
Once the foundation is sealed tight, we shift our attention to the bottom of the trench. We never just lay the pipe on bare dirt. Instead, we create a bed of clear gravel—usually ¾-inch stone—about three to four inches deep.
The type of stone we use here is a non-negotiable detail. "Clear" means it has been washed and is completely free of sand, dirt, and other fine particles that could eventually clog the system. The spaces between these clean stones create an open channel for water to flow easily towards the pipe.
Think of this gravel bed as a mini French drain running along the entire base of your foundation. It's the first stage of drainage, ensuring any water pooling at the footing gets funnelled directly into the weeping tile instead of just sitting there.
Laying and Connecting the Pipe
Now for the weeping tile itself. We always use high-quality, rigid perforated pipe, which is much more durable than the flimsy, corrugated tubing you sometimes see. But the real key is how we place it, a detail that inexperienced installers often get wrong.
The perforations or slits in the pipe must always face down. This might sound backward, but it’s correct. As water rises from below and moves through the gravel, it enters the pipe through these downward-facing holes. If they were on top, the pipe would just fill up with silt and debris over time, leading to a major clog.
The pipe is laid directly on that fresh gravel bed, carefully following the slight, continuous slope we dug out earlier. Each section is fitted together snugly to form a solid conduit leading straight to the sump pump liner or storm sewer connection. This final connection needs to be rock-solid to prevent any issues right at the exit point.
As a final step, we wrap the entire perforated pipe in a geotextile filter fabric, often called a filter "sock." This fabric is the system's last line of defence, letting water pass through while blocking fine sand and silt from ever getting inside the pipe. It’s a simple but vital layer of protection that drastically extends the life of the whole installation.
Backfilling and Restoring Your Property
https://www.youtube.com/embed/BJ_jPZ31KQI
Getting the pipe in the ground is a huge milestone, but the job is far from over. Honestly, these final steps—backfilling the trench and restoring your property—are what truly separate a professional job from one that will cause headaches later on. This is where meticulous care ensures your yard won't sink and your new drainage system is protected for decades.
We’ve seen the aftermath of a rushed backfill all too often. Six months after the crew leaves, the homeowner notices a long, ugly dip forming along their foundation. That’s a clear sign the soil wasn't returned and compacted properly. It’s a completely avoidable mistake.
The Right Way to Backfill a Trench
First things first, we add another layer of clear ¾-inch gravel. This completely covers the new weeping tile and extends about 12 inches above the pipe. Think of this gravel layer as a crucial buffer zone. It creates a super-permeable area that lets water from the surrounding soil easily reach the pipe without getting clogged by fine silt or dirt.
With that protective gravel in place, we can start adding the original excavated soil back into the trench. This isn't just a matter of dumping it all in at once. We work in manageable layers, or "lifts," of about 8 to 12 inches at a time.
After each lift goes in, we bring out a mechanical tamper to compact the soil thoroughly. This methodical process is absolutely essential for removing air pockets and making sure the ground is stable. Skipping or rushing this step is exactly what leads to those sunken trenches and grading problems that can pool water right back against your foundation.
A proper backfill is a carefully layered process. First, you protect the pipe with a generous bed of clean gravel. Then, you return the original soil in compacted lifts. This is the only way to guarantee the ground stays stable and your landscaping looks just as good as it did before we started.
Restoring Your Property and Landscaping
Our philosophy is simple: leave your property looking like we were never there. Once the trench is filled and compacted to the proper grade, we get to work on the restoration. This means carefully putting back every single thing we had to move at the start of the project.
This phase could involve a number of things, depending on your property:
- Re-laying patio stones for walkways or patios, making sure they’re perfectly level and secure.
- Replanting gardens and shrubs that we temporarily and carefully relocated.
- Adding fresh topsoil and seed or sod to any lawn areas that were disturbed.
We take immense pride in this final phase, restoring the natural look and feel of your yard. It’s the finishing touch that shows a real commitment to quality from start to finish. This detailed approach to water management is becoming more critical everywhere, not just for basements. For instance, advanced drainage techniques are now being used for environmental sustainability in agriculture, like the methods being explored in California. You can discover more insights on how drainage impacts water quality on the California Department of Food and Agriculture's website.
Final System Checks and Testing
Before we even think about packing up our tools, there’s one last critical step: a full system test. We have to be 100% certain that everything is working exactly as designed.
We’ll typically run a garden hose into the system at its highest point, introducing a steady flow of water. We watch carefully to see that the water travels smoothly through the pipes and discharges cleanly into the sump pit. From there, we test the sump pump itself, ensuring the float switch activates at the right level and the pump forcefully ejects the water away from your foundation.
This final check gives you, the homeowner, complete peace of mind. It’s our definitive proof that your new weeping tile system is fully operational and ready to protect your home the next time the skies open up.
Your Weeping Tile Questions, Answered
Even with a step-by-step guide, it's natural to have more questions pop up. Installing a weeping tile system is a big deal for your home's health, and you should feel completely confident before moving forward. I've pulled together some of the most common questions we hear from homeowners around the GTA to give you straight-up, honest answers.
How Long Does a Weeping Tile System Last?
This is the big one, and for good reason. When a professional installs an exterior weeping tile system using the right materials and techniques, it should honestly last the life of your house. We're talking 50 years or more.
What makes it last that long? It all comes down to the details:
- Using rigid, non-corrugated PVC pipe that won’t get crushed by the weight of the soil.
- Wrapping the pipe in a high-quality filter fabric to keep out the silt and sand that cause clogs.
- Surrounding it with clean, clear gravel so water can flow freely into the pipe.
- Properly waterproofing the foundation wall before any of the soil goes back in.
When you tick all those boxes, you’re not just putting in a temporary fix—you’re installing a permanent solution. It's an investment that pays you back for decades.
Can I Install Weeping Tile Myself?
I get it, the DIY spirit is strong. And while the concept behind a weeping tile system seems simple enough, the actual job is incredibly complex and physically brutal. Digging that trench is just the start.
You run the risk of hitting a buried utility line, or even worse, getting the slope wrong. If the trench isn't graded perfectly, the system simply won't drain, and all that hard work will have been for nothing. Pros use tools like laser levels to guarantee the precise slope needed for gravity to pull water away from your home. This is one of those projects where a small mistake can lead to a massive, expensive failure.
We can't tell you how many failed DIY jobs we've been called in to fix. Having to dig everything up a second time to correct the mistakes always costs far more than just hiring an experienced crew to get it right from the start.
What Does Weeping Tile Installation Cost?
Everyone wants to know what to budget for. A good starting point is understanding the typical drainage tile installation costs, but the final price tag for a professional job can really swing depending on your specific property.
Here's what moves the needle on cost:
- The perimeter of your house: A bigger foundation just means more digging, more pipe, and more labour.
- The depth of your foundation: Deeper footings require a much more significant and challenging excavation.
- Access to the work area: If your house is in a tight spot or has mature landscaping, it adds complexity and time.
- The need for a sump pump: If your home doesn't already have one, that will be an essential part of the system.
An exterior system is definitely a major undertaking, but it's also the single most effective way to protect your foundation for the long term. The best thing you can do is get a detailed, written quote from a reputable contractor who can walk your property and see exactly what's involved.
Are There Any Rebates or Subsidies Available?
Yes! This is a great question that a lot of people overlook. Many municipalities across the GTA offer programs to help homeowners who are proactive about flood prevention. The specific programs can change, but cities like Markham, Halton Hills, and Sarnia have offered rebates that can cover a big chunk of the cost for things like weeping tile disconnection and sump pump installation.
These subsidies exist to help take the pressure off the city’s sewer system during those heavy downpours. It’s always worth checking your local city’s website or calling the building department to see what flood prevention programs you might qualify for. It can make a real difference to your bottom line.
At G1000 Home Substructure, we believe a dry basement is the foundation of a healthy home. With over 25 years of experience in waterproofing and foundation repair across the GTA, we have the expertise to install a weeping tile system that protects your property for the long haul. If you're ready for a permanent solution to your water problems, start with a free, no-obligation consultation by visiting us at https://g1000home.ca.

